Showing posts with label Tutorials. Show all posts

Sunday, August 21, 2011

Happy birthday to you!

Hi Peeps,

Have a look at this cute bag I made using 3 dies.  Another fun project for CMIT.


Supplies

Black cardstock
Quickutz/Lifestyle Crafts Gift bag die  (DC0115)
Quickutz/Lifestyle Crafts Victorian Flourish (REV-0025).
My Favorite Things rolled flower die

So easy to make that no instructions are required.

Use this as a goodie bag for birthdays, easter, weddings....anything!

Saturday, August 20, 2011

Is it a Paper bag....is it a card.....it's both!

I had to wrap a gift for a friend AND make a card and this is what I came up with..........


Supplies

Quickutz/Lifestyle crafts Botanical Cupcake Liner
Quickutz/Lifestyle crafts Zig Zag Border
My Favorite Things Cloud Trio Die-namics
White felt
Orange Rhinestones on the botanical cupcake liner
My Favorite Things Retro Daisy Die-namics
My Favorite Things 'Tag - You're it' Die-namics

The little banner was made using the off cut of the zig zag border and to finish the project I  handstitched with a black pen.

I hope you feel inspired to create something too!

Ciao Ciao!

Friday, July 29, 2011

Tis' nearly time for Halloween

I love this little Halloween Luminaria I created for the August Holiday Project for CMIT.


Here is the Luminaria whithout the witch.  A Luminaria for any occassion!


Supplies used:

Quickutz/Lifestyle Crafts Witch (REV-0233)
Quickutz/Lifestyle Crafts Window (REV-0212)
Sizzix web embossing folder
Velum
Tattered Angels Glimmer Mist Iridescent
Black cardstock from Aussie Scrap Source


  1. Cut out 4 windows in black cardstock
  2. Cut out the velum pieces to fit the back of the window (6.2cm x 8cm) 
  3. You can emboss all four windows, I only did one to show you the options.
  4. Cut 4 strips of black cardstock (1cm wide x the height of the window), score down the centre and fold.  These will be the joins for the windows.
  5. Cut out the witch and spray with glimmer mist.  If you wanted to Glimmer Mist the windows, I would do that before adhering the velum.
  6. Adhere the velum to the inside of the windows
  7. Put double sided tape or roll tape on the corner pieces and stick to one window then the next until you have all four pieces joined. 
  8. Stick the witches feet to the top of the window box.  For added strength, you could add a skewer (pain it black) to the back of the witch to stop from bending.
  9. Light a tea light or use the electric version readily available
Ta da!  Project Halloween commmpleted!

Monday, July 25, 2011

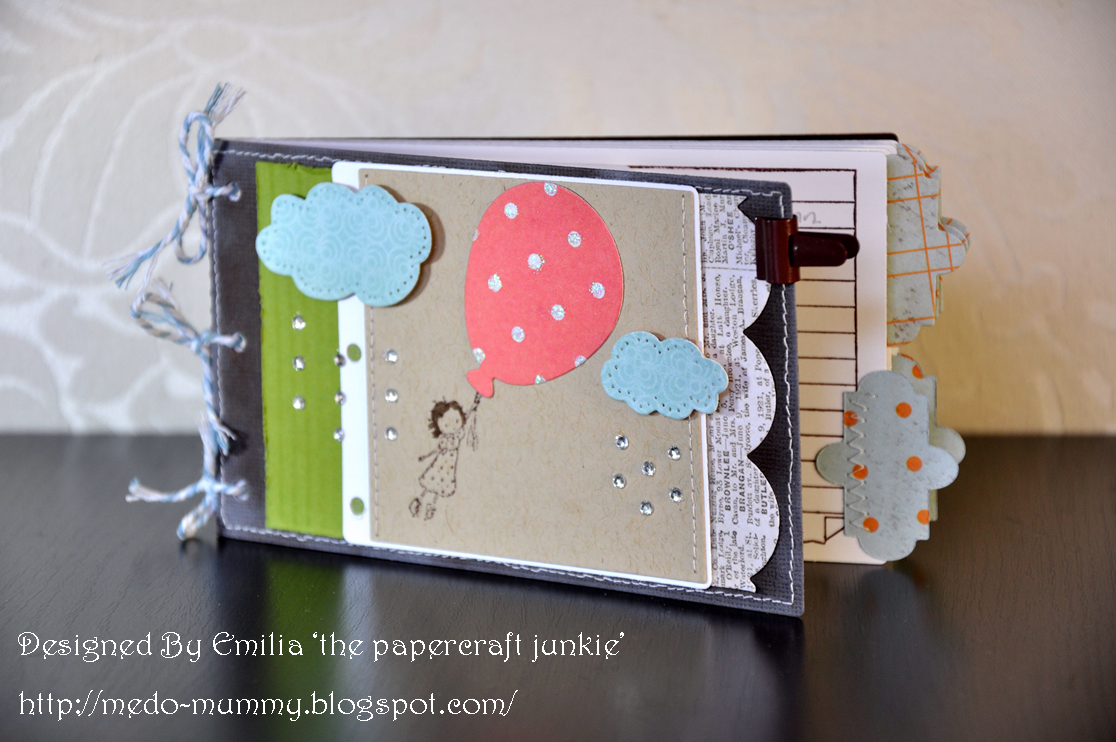
A Birthday & Anniversary book

I've always wanted to make a little book where I can keep track of everyone's birthday and anniversary.

This is a little book of special dates that I designed and created for CMIT.


Supplies used:


  • Quickkutz/Lifestyle Crafts Santa's workshop wintergreen folder
  • Quickutz/Lifestyle Crafts Santa's workshop wintergreen page die
  • Quickutz/Lifestyle Crafts Santa's workshop sugarplum page die for inserts and cover
  • Quickutz/Lifestyle Crafts Santa's workshop sugarplum page mat
  • Quickutz/Lifestyle Crafts Nesting Balloons CC-Balloons-02
  • Quickutz/Lifestyle Crafts Scallop Set CC-BDR-064
  • Quickutz/Lifestyle Crafts Nesting Frames L-CC-008
  • Prima stamp set
  • My Favorite Things cloud dies
  • My Favorite Things Four point frame stamp set
  • Chocolate/green/kraft paper from Aussie Scrap Source
  • Patterned papers from Scenic Route
  • Twine from 'The Twinery'
  • Sewing machine and white cotton thread
  • Whisper white paper from Stampin' Up
  • Chocolate chip ink from Stampin' Up
  • White Kraft ink for brushing edges with dauber/sponge
How to:
  • Punch out 1 wintergreen folder
  • Punch our 6 wintergreen page dies
  • Punch out 7 sugarplum page dies (6 white and one kraft)
  • Punch out 12 nesting frames die for the tabs
  • Punch out 1 Balloon from nesting ballons
  • Stamp image on Kraft with chocolate ink and cover stamped image of balloons with 1 nesting balloon
  • Punch out 2 clouds form MFT's cloud trio, faux stitch the edges and mount on foam squares
  • Punch our wave edge as tall as sugarplum page insert (usinf newspaper print cardstock from Scenic Route)
  • Soften edges of the binder with white ink and a dauber
  • Faux stitch all around the binder cover
  • Corrigate and cut out green piece of paper as tall as sugarplum page insert
  • Stitch together sugarplum page mat (stamped with image on kraft) and sugarplum page die (cut out in white) the attach to either side the green corrigated edge and scalloped edge
  • Mount the clouds on the card and embelish with bling for the rain.
  • Tie the folder and inserts together with twine 

Ta Da!

All done....great as a gift or to keep for yourself.  I chose the later ....wicked lol!

My next CMIT project..........Halloweeeeeeeeeeeen!

Sunday, July 17, 2011

Freedom to create!

Well, I love that CMIT have given us the opportunity to create a few projects a month using whatever media we like!

Who wouldn't want to work for someone like that?

This is my first project for July.


You guessed it!  It's a notebook.

Of the Quickutz dies, I used 5 dies from 3 die sets.  Santa's Workshop, Tags and the 12" Measuring Tape die.

Supplies:
  • Quickutz / Lifestyle Crafts Tags Die (REV-0301)
  • Quickutz / Lifestyle Crafts Santa's Workshop Peppermint Binder (CC-SHAPE-062-3)
  • Quickutz / Lifestyle Crafts Santa’s Workshop Nesting Ovals
  • Quickutz / Lifestyle Crafts Measuring Tape (CC-BDR-069)
  • Tim Holtz Gridlock embossing folder
  • Stampin' Up Whisper white ink pad
  • Jute Twine
  • Kraft Paper from Aussie Scrap Source
  • Scenic Route Paper Co ‘Sweet Linen’
  • Stampin' Up white cardstock
  • Yellow, Black and Blue cardstock brand unknown.
  • White gel Pen for stitching
  • Coloured buttons and Bling
Cut out 2 Peppermint folder sleeves from the Santa’s workshop for the front and back.
Cut out measuring tape.
Pierce holes in the card around 3 edges then join the dots for faux stitching.
Emboss part of the cover & use a sponge to soften the edges with Whisper white ink.
Cut out additional peppermint pages for internal sleeves and decorate.
Cut ovals, sand & hand draw faux stitching.
Write on label & adhere with foam squares.
Bind with Jute twine and Viola!!
E

Monday, July 11, 2011

Back to School Project for CMIT

I love to make cards but most of all I prefer to do make things or decorate things other than cards.

I am now a member of the CMIT Design Team and our Holiday project for July is 'Back to School'.

Here is my project.


It's ......a Bookmark!
  
Products / Supplies: 
  • Quickutz / Lifestyle Crafts Award Die REV-0040
  • Scenic Route Paper Co ‘Sweet Linen’ (top half of bookmark) and ‘Appleton’ (bottom half of bookmark)
  • Kraft Cardstock from Aussie Scrap Source
  • Spinach Cardstock from Aussie Scrap Source
  • Stampin Up Whisper white ink
  • Grey felt for the ribbon (brand unknown)


Instructions:

I rounded the top 2 corners of Kraft and patterned paper.

Handstitch the Appleton paper with black ink, softened edges of the card and top part of award with Whisper white cardstock using a dauber or sponge. 

Glue everything down except for top portion of award where I used foam circles.

The bookmark measures approximately 6cm x 20.5cm.

The Quickutz / Lifestyle Crafts Award die is sooooo versatile. 


To help get your creative juices flowing, some other ideas for the Award die include:
  • Create an award for themes parties like an Olympics Party to hand out with prizes,
  • You can use the finished award die cut with an award chart to reward your child for good behaviour or a job well done!,
  • Offer to help a teacher at school with this nifty die for their next sports carnival; or
  • Use the top part of the award as a flower.  Cut out multiples, spray with glimmer mist (not necessary), scrunch several times and when unwrapped can be layered to form a gorgeous vintage/shabby flower.

Hopefully these ideas have inspired you to make something, be creative and have fun!


Ciao for now! 


E